The Battle
On the morning of the 29th the royalist army marched north from the royalist garrison at Banbury, along the main road on the east side of the Cherwell towards Daventry. With some 9,000 troops at his disposal, Charles may have hoped to draw the parliamentarians into battle on ground of his choosing. Shadowing the king, Waller advanced along the major road on the west side of the Cherwell, with an equal number of troops. When Waller halted at Great Bourton to survey the ground, the armies were little more than a mile apart.
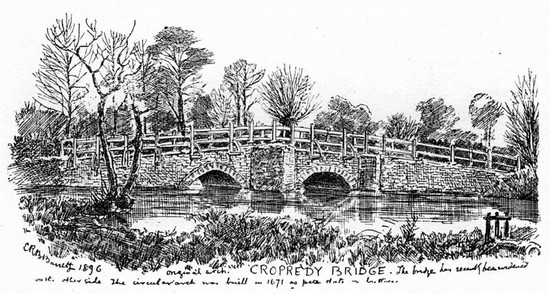
Appraised of the approach of some 300 parliamentarian horse from the north, Charles had sent the Royalist advance guard of horse forward to Hay's Bridge, instructing the infantry to hurry to their support. Charles was aware of the potential danger of the crossing of the river Cherwell down in the valley at Cropredy and had despatched a party of dragoons to hold the bridge until his army had passed by. From Waller’s vantage point on Bourton Hill it became apparent that Charles had allowed his troops to become dangerously spread out, with his rearguard strung out beyond Williamscot to the south. Waller, sensing an opportunity, despatched troops under General Middleton to Cropredy Bridge and the crossing at Cropredy mill, while he himself led the remaining cavalry across Slat Mill Ford, further to the south. His intention was to surround the Royalist rearguard, separate them from the main body, and destroy them.
Middleton took the bridge at Cropredy with little effort and the parliamentarian cavalry then pursued the royalists to Hay's Bridge, leaving the infantry to cross the Cherwell and deploy. Middleton’s cavalry had made the same error as Charles, in allowing the cavalry and infantry to become separated by too great a distance. When the royalist forces, both horse and foot, turned and faced Middleton’s cavalry the parliamentarians were forced to retreat, having left their own infantry support a mile and a half behind them. The royalist cavalry under the Earl of Cleveland then launched an attack upon the isolated parliamentarian infantry, but were repulsed when the parliamentarian infantry were supported by their cavalry returning from Hay's Bridge. Charles, realising what was happening in the rear, returned with the vanguard to their support. With reinforcements Cleveland launched a second attack on the parliamentarian position at Cropredy driving the parliamentarians back over the bridge and capturing 11 artillery pieces in the process.
Meanwhile Waller, after crossing the ford at Slat Mill, faced the royalist cavalry under the Earl of Northampton, which were deployed along the top of the hill beside Williamscot. Waller was obliged to advance up a steep hill and, in the brief action which followed, this disadvantage of ground contributed to the parliamentarians being rapidly forced back across the ford. Waller withdrew most of his troops to Bourton Hill leaving detachments to guard the crossings. Skirmishing continued around the river crossings, particularly at Cropredy Bridge, but the day ended in a stalemate. The two sides faced each other across the Cherwell but neither was inclined to attempt another crossing. The armies remained in these positions until the following day when Charles, on learning of the approach of some 4,500 parliamentarian reinforcements, prudently withdrew under the cover of night.