The Campaign
On 11th June 1685 Monmouth and his supporters landed at Lyme Regis in Dorset. They arrived in three small ships with just four light field guns, 1500 muskets and equal quantities of armour. In all there were no more than about 300 men while practically all the money had already been spent. The invasion had been inadequately funded, lacked sufficient arms and equipment and had at its core only a tiny body of experienced soldiers, including a few mercenaries such as the Dutch gunner who would command the artillery.
In contrast James II had inherited from his brother a small but well trained, well equipped and ably led professional army. Its second in command was John Churchill who later, as Duke of Marlborough, would be responsible for some of the most famous of British victories. Once this standing army was fully mobilised and supported by the local militias the rebels would have little chance of success in a pitched battle. But the royal forces swiftly received news of the landing as two customs officers of Lynne arrived in London on the 13th June having ridden some 200 miles. Monmouth's only chance was to raise forces and money rapidly and take control of Bristol, the second city in England where he had strong support. Then he would march on London, hoping that elements of the royal army would defect to him.
Thousands flocked to his colours as Monmouth marched through the South West, to Taunton (18th June) where a proclamation was issued declaring him king, then on to Bridgewater from where he marched towards Bristol. A significant proportion of them were nonconformists who had suffered increasing persecution under Charles II. Others were disaffected because of the economic recession which had recently hit the south west particularly hard. Most were labourers and artisans rather than the peasants of popular tradition. They even included amongst their number a young Daniel Defoe, later to become famous as an author. At its height the rebel army numbered more than 5000, perhaps as many as 7000, but the level of support did not match that which Monmouth and his supporters had expected. In particular the gentry did not seem to be rallying to the cause.
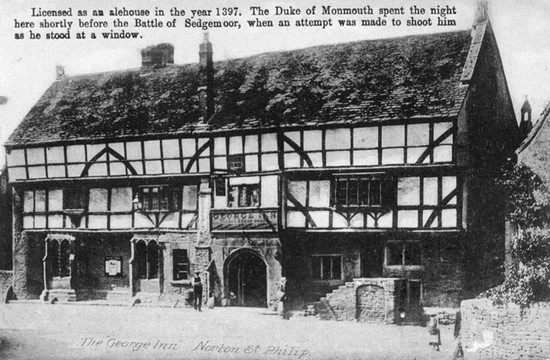
The rebels dealt with various local militia forces in minor skirmishes. But already Monmouth’s ships had been taken by the navy, removing his opportunity for escape, and a naval presence along the south coast guarded against any hope of reinforcement, though none was planned (Bryant, 1947, 121). Churchill had been dispatched to the South West as Major General with 6 troops of horse and 5 infantry companies with the Tangier garrison, recently returned to England, soon to follow. Monmouth’s advance was too slow and Lord Feversham, the commander of the royal army, reached Bristol with his Horse Guards before the rebels. At Keynsham on the 26th, intending to skirt around and attack Bristol from the more vulnerable north side, they found that the royal forces had attempted to block their advance on Bristol by breaking the bridge over the Avon. The rebels contrived a temporary repair but then were beaten in a skirmish with a detachment of royal cavalry. Monmouth decided not to attempt an attack on Bristol and his summons to Bath to surrender was refused. They then turned eastward towards London. As time passed the royal forces were increasing in strength as the professional units and the militias rendezvoused. Most importantly, Churchill joined with Feversham at Bath. Yet despite their lack of equipment and experience, in a major skirmish at Norton St Philip on the 27th June the rebels got the upper hand. The royal forces, advancing into the town which had been the rebel headquarters that night, had been surprised in an ambush. If Monmouth had now attempted a bold attack then it might have led to a dramatic defeat for the royal army which, with about 2500 troops, was just half the size of the rebel force. But Monmouth did not to grasp what was surely his best opportunity of the whole campaign.
From now on the rebel’s position seemed ever more hopeless. With the failure to reach Bristol before Feversham on the 23rd June they had lost the initiative. At Norton St Philip on the 27th Monmouth had failed to take the only real opportunity the campaign would offer of inflicting a serious defeat on the royal forces, which might have caused James’s troops to begin to defect and many more Englishmen to rally to the rebel cause. Now, while the army rested at Frome on the 28th, the news arrived of the failure of Argyll’s Scottish rebellion. Argyll, who had set sail 3 weeks earlier than Monmouth had been captured and executed before he could even raise his standard. The expected Cheshire rising had also failed to materialise. The rebels realised they stood alone and that the royal army could concentrate all its forces against them.
The morale of the rebel force began to collapse. As Monmouth began to retreat his forces began to desert in large numbers, men taking up the amnesty offered by James II for those who abandoned the rebellion immediately. Churchill had been dispatched to Dorset to cut the rebels off from the channel ports and so Monmouth's army fell back into the south west. They reached the town of Bridgewater on the 3rd July, believing wrongly that a large body of peasants had been raised in support. But Bridgewater was a significant port which had been a royalist garrison in the Civil War and was relatively isolated on the western edge of the extensive wetlands of the Somerset Levels and approached by causeways across the moor. It was here that the rebel force was cornered when the royal army arrived on the 5th July, quartering 3 miles south east of Bridgewater at Westonzoyland and the adjacent villages of Middlezoy and Othery.
1000 years earlier the Somerset wetlands had provided refuge for King Alfred and from them he had launched his dramatically successful campaign against the Danes. On the 6th July 1685 the Duke of Monmouth similarly tried one last desperate attack. The 'Pitchfork Rebellion' was about to reach its climax on the bleak wastes of Sedgemoor.


