A Battlefield Walk
2.5 miles. Level terrain, mainly along metalled paths and lane although it can be wet and muddy on the moor. The walk starts from Westonzoyland church. There is a pub and a shop in Westonzoyland, but no public toilets. The walk described here is meant to be used in conjunction with the Battlefield Explorer map, which can be downloaded from the Media Store.
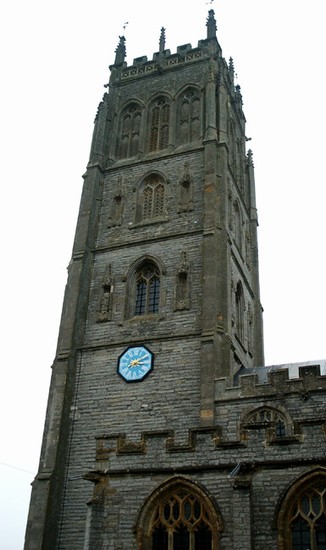
WESTONZOYLAND CHURCH
As so often after 17th century battles, the church provided the largest and most secure building within which to hold the prisoners. Hundreds of men, some wounded and a few dying, were herded into Westonzoyland church after the battle. The handsome decorated pews which fill the nave were there at the time and may have provided a little comfort for wounded and terrified men, better at least than the cold stone flags of the floor. By the time the surviving prisoners had departed the church was in such a terrible state it had to be not only cleaned but fumigated!
The South aisle of the church houses an information hub about the battle with films, replica exhibits and pamphlets.
WALK FROM THE CHURCH
From the church walk northward along the lane by the west side of the churchyard. This leads to the narrow alleyway which runs between the modern housing and down to Monmouth Road. Turn right and follow the road as it curves northward turning into a narrow lane with a few older houses and leads to Bussex Farm. At the junction of the lane and droves is the battlefield interpretation panel (grid ref: ST354354). The Bussex Rhyne ran across the northern corner of the field to the north of the panel and it appears that it was here that the upper plungeon lay. Had Grey’s cavalry found and crossed the plungeon they would have charged straight through where you are standing and down the line of the modern lane that you have just walked up, to capture the royal artillery.
Just to the north east of the interpretation panel is Bussex Farm, where the Sogg Drove leads off from the village loop road and down to the battlefield monument. When I last visited we went in to Bussex Farm to get permission to walk across the field opposite the monument to look at the surviving earthwork of the Bussex Rhyne and so to walk along the front line of the rebel army. If you do the same then watch out for the two sheepdogs in the farmyard - they were loose and very interested in us, barking and yelping. They seem to respond well if you talk to them but I still watched carefully behind me in case one of them nipped my ankle! It was worth the effort because the farmer is very friendly. He was happy to chat and says that quite a few people take the trouble to look in before they walk over the battlefield. We signed his visitors book and he kindly brought out a couple of small display cases. In one was a silver button of the period found on the battlefield, probably lost in the action by one of the wealthier of the combatants; in the other were half a dozen lead shot from the site, mostly for musket but with one from a pistol.
From the interpretation panel at the junction of lane and droves take the Sogg Drove westward into the heart of the battlefield. Though the moorland has long since gone, replaced by pasture and in places now by arable crops, this landscape still has a distinct and very engaging character. The noise and bustle of the 21st century can be left far behind in the peaceful tranquillity of Sedgemoor. On some other battlefields, like Roundway Down or Lansdown, the terrain is so dramatic it shouts out to you and even the least observant visitor can hardly miss the significant topographical features. But here on Sedgemoor you have to work hard, but it will repay the effort. If you spend some time exploring the moor, viewing it from different locations, you begin to understand the terrain as it must have been in 1685. Once you understand the historic terrain you can at last begin to appreciate the challenges and opportunities that faced the commanders.
THE ROYAL ARMY'S CAMP
As you walk out along the Sogg Drove about half way down (350m) look left across the drove-side ditch towards Westonzoyland church. Despite the drainage system, across most of the foreground the pasture field is covered with the sedges that gave Sedgemoor its name. At the far side of the field however the sedges stop as ground rises suddenly, no more than a few feet, onto the island of Zoy on which the village lies. A modern housing estate has encroached across part of this land. The closest house stands where a house stood in 1685 and the hedge is that which enclosed the fields on the small Bussex island at that time. The majority of the farmhouses of the hamlet of Bussex then stood close to where there is now, in the distance, a row of council houses. The royal infantry were camped on the very edge of the island, extending no further to the left that the isolated house but running to the right almost as far as where the Sogg Drove now turns back southward towards the village.
Follow along the Sogg Drove which turns sharp left. After turning look left as you walk down this drove. The Bussex Rhyne ran north-south through this field and half way across the field is the probable location of the lower plungeon. Go past this first field an look across to your left again. It was in this second field, close to the far side, that the royal artillery were positioned that night, facing the track running across the moor from Bridgewater to cross the plungeon. The tents and wagons of the royal artillery train were positioned in the area beyond where there is a new housing estate. Turn and look in the opposite direction. Somewhere out there, alongside the track to Bridgwater lay the Penzoy Pound where royal musketeers provided a forward guard against a rebel attack across the moor from the west.
THE INFANTRY ACTION
Now retrace your steps along the drove and after turning sharp right take the drove which leads off on the left. This is Langmoor Drove which leads to the battlefield memorial, in the second field on the left. As you approach the hedgerow you walk through the royal infantry front line, then near the hedge you cross the line of the Bussex rhyne. The rebel infantry positions were just another 30 yards in front of you.
From the monument look north westward towards the tower of Chedzoy church, nearly a mile and a half away (2.2 km). In the middle distance almost half a mile (700 metres) you will see the moor edge – a quite slight but very distinct rise in the ground onto what in the 17th century was Chedzoy island. It was between here and the modern Chedzoy New Cut that the combined royal cavalry and infantry assault destroyed the rebel army. It was across the moorland beyond and up to the island that many of the rebels fled, some being cut down on the moor and dozens more in the standing corn on the island.
Unlike much of the moor, the long narrow field behind the monument is permanent pasture. There are irregular earthworks right across the field. Hidden amongst these slight humps and bumps, some of which may be old drainage channels and wet hollows from the period before enclosure, is the site of a mass grave from the battle.
THE BUSSEX RHYNE
From the monument, if you have gained permission, you can walk through the field gate on the opposite side of the drove and into the pasture field. Here the Bussex rhyne is clearly visible as a linear hollow no more than half a metre deep and about 10 to 15 metres wide. This former drainage dyke, abandoned ever since the new drainage system was put in during the late 18th century, is normally dry now, except perhaps in times of heavy rain. Its replacement, planned out with the ruler of the drainage surveyor in the 1790s, lies at the south side of the field. Unlike its modern replacements the rhyne wanders across the field in an irregular fashion with other lesser channels, also long since drained, running on from either side. When I visited in October 2002 the archaeologists from the Two Men in a Trench series had not long departed and the position of their excavation trenches were clearly visible. Their work has shown that the rhyne was about 15 metres wide but probably less than one metre deep. This may not seem much, and the earthwork of the old watercourse certainly does not look as though it could have been a particularly formidable obstacle. However, to cross a wet ditch of those proportions at night, in mist and under fire from a strong opposing force of musketeers would have been no simple task for a battle hardened professional army let alone for the inexperienced and ill equipped rebel force under Monmouth’s command.
From here you can now retrace your steps along Langmore Drove to the Sogg Drove, turn left and return to your starting point by the church.