The Cavalry Attack
There was an initial artillery exchange but this was probably not particularly effective. At a distance the roundshot might take out a few unlucky men, such as Kingsmill whose monument is in Radway church, but the most significant influence may have been upon morale of the largely inexperienced troops, seeing a few of their colleagues torn to pieces. It was only at close quarters that the field pieces came into their own, as they would later in the day at Edgehill, when firing case shot. These boxes, usually containing a large number of musket balls, broke open and scattered widely as they left the barrel and within a hundred metres or so could prove a very destructive weapon.
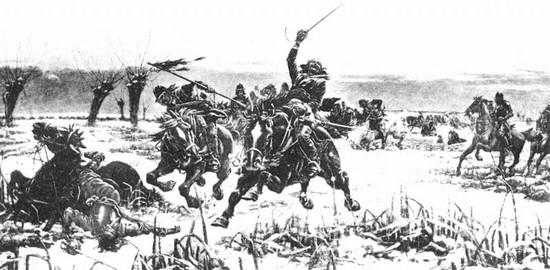
Rupert used dragoons to clear the enemy musketeers from the hedgerows on his right flank, allowing him to mount his all important cavalry attack. Despite the extra firepower provided by the musketeers interlining Ramsey’s cavalry and the support of three pieces of ordnance, Rupert’s advance was not halted. Using tactics that time and again routed parliamentarian cavalry, Rupert’s troopers were instructed to charge home without halting to fire their pistols. Having taken a highly defensive stance on the top of the slight hill and behind hedgerows, the parliamentarian cavalry had to stand to take the royalist charge instead of meeting it at the charge. Then one of Ramsey’s troops of horse changed sides, to support the King, as Rupert’s troops came on. The royalist troopers cleared the hedgerow and burst in amongst Ramsay’s men. This was too much for the parliamentarian cavalry who turned and fled, just as their fellow troopers had done at Powick Bridge a few weeks earlier. The parliamentarian infantry brigade adjacent to the cavalry were also broken and fled, weakening Essex’s position even further.
On the royalist left the terrain was far more difficult, with far more hedgerows held by parliamentarian musketeers. But again dragoons, riding to the field and then dismounting to fight on foot, were used to clear the hedgerows. This allowed Wilmot’s cavalry to charge, with a less effective result than that achieved by Rupert on the right wing.
The royalist horse seconding Rupert's wing followed his lead in pursuit of the fleeing parliamentarian cavalry and on the royalist left Digby also followed Wilmot into Kineton. Both should have remained on the battlefield to attack Essex’s infantry and fight the remaining parliamentarian cavalry. The royalist horse pursued the fleeing troopers for perhaps four miles or more, to Kineton and well beyond, cutting down the routed and disordered parliamentarian cavalry. Many of the royalist troopers seem to have abandoned the pursuit and attacked the baggage train when they reached the town.
Just a handful of horse on both sides managed to regroup in support of the infantry. In this situation Balfour’s troops of parliamentarian horse which had not been routed by Wilmot's charge, came into their own, helping to turn back the tide of the royalist advance.